The Complete eBike Chain Maintenance Guide: From My Garage to Yours
I’ve been riding and wrenching on electric bikes for the better part of seven years now, and if there’s one thing I’ve learned the hard way, it’s that the_chain on an eBike is not the same beast as the chain on a traditional bicycle. The first time I snapped a chain halfway up a steep climb in the Bavarian Alps, I was stranded with a 25kg bike and a bruised ego. That was the day I started taking chain maintenance seriously.
European eBikes, with their higher torque outputs and heavier frames, punish chains in ways that conventional bikes simply don’t. Whether you’re commuting through Amsterdam, touring the Tuscan countryside, or tackling the daily grind in Berlin, your chain is working overtime. This guide is everything I’ve learned about keeping that chain happy, healthy, and spinning smoothly.
Before diving in, it’s worth noting that chain care is just one piece of the maintenance puzzle. For a comprehensive look at keeping your entire electric bike in top shape, check out our complete eBike maintenance guide. And if you’re still shopping for your perfect ride, our eBike value guide covers excellent options across every budget.
Understanding Your eBike Chain: Why It’s Different
When I first got into eBikes, I naively assumed the chain was just another bicycle component. I couldn’t have been more wrong. The average European eBike motor delivers between 40 and 85 Nm of torque to the chain. For context, a strong cyclist might put out 200 watts of power; a mid-drive eBike motor can deliver 250-600 watts continuously, with peaks far higher. That chain is under constant, relentless stress.
The weight factor compounds everything. My touring eBike tips the scales at 28kg fully loaded. Compare that to my old road bike at 7 Cottage 7.5kg, and you start to understand why eBike chains wear faster, stretch quicker, and demand more attention. The chain isn’t just transferring your pedaling power—it’s handling the motor’s output while managing a significantly heavier machine.
Essential Tools for eBike Chain Maintenance
Over the years, I’ve refined my toolkit to the essentials. You don’t need a professional mechanic’s workshop, but a few specific tools make all the difference:
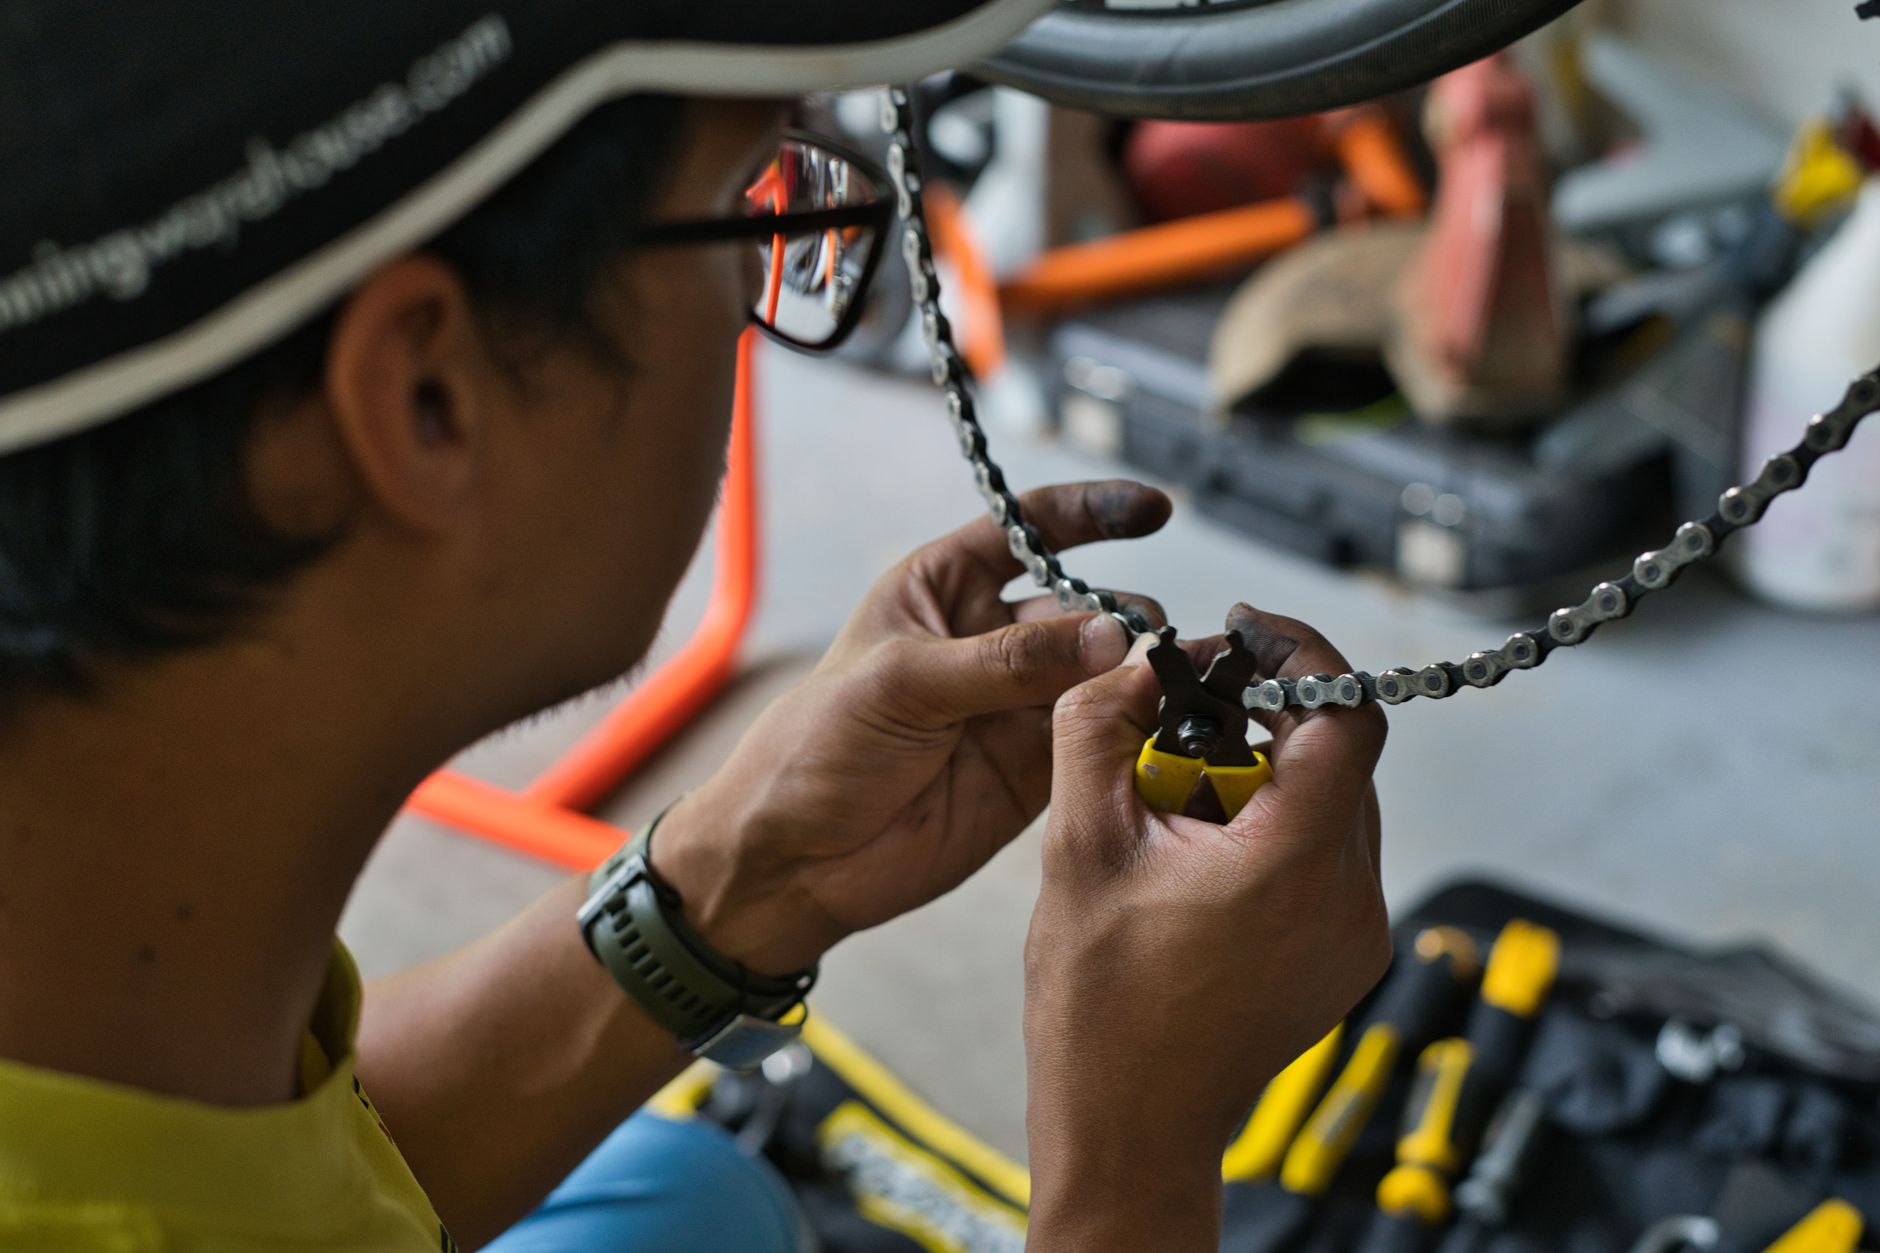
- Quality chain breaker and riveting tool: eBike chains often require specific joining methods. I use a Park Tool CT-3.2, but any reputable tool works. The key is precision—cheap tools mushroom pins and ruin chains.
- Chain wear indicator: I prefer the Park Tool CC-4.2, which gives precise percentage readings. At 0.5% wear, start planning replacement. At 0.75%, replace immediately. On eBikes, I err earlier due to the higher loads.
- Chain cleaning device: The Park Tool CM-5.3 or similar. Mine has seen hundreds of uses and still performs flawlessly.
- Degreaser: I use biodegradable citrus degreaser. In the EU, environmental regulations matter, and proper disposal is legally required.
- Quality chain lubricant: More on this below—this is where many riders go wrong.
- Old toothbrushes and rags: Simple, but essential for detail work.
How Often Should You Service Your eBike Chain?
This is the question I get most often, and the answer is frustratingly variable. My personal rule, developed through trial and error:
Chain lubrication: Every 200-300km in dry conditions, every 100-150km in wet or dirty conditions. For my daily commuter in Hamburg’s frequent rain, that’s roughly once a week.
Deep cleaning: Every 500km or when the chain gets genuinely gunky. You’ll know—black paste on the links, gritty sound when pedaling, or visible accumulation on the cassette.
Replacement: When wear reaches 0.5-0.75% on the indicator. I track this monthly on my primary bikes. My touring bike, which sees heavy loads and plenty of hills, gets chains every 2,500km. My lighter city bike stretches to 4,000km.
The key variable is your riding conditions. A friend in Mallorca with dry, clean roads gets double my chain life. Another in the Scottish Highlands, with constant wet and grit, replaces chains almost monthly during riding season.
Step-by-Step Chain Cleaning: My Proven Method
Preparation and Removal
I always start by removing the chain. Yes, you can clean on the bike, but you’ll never get it truly clean, and you’ll contaminate your cassette, chainrings, and derailleur pulleys with dirty solvent. With a quick link or proper chain tool, removal takes two minutes. I lay down newspaper or an old towel—this gets messy.
The Deep Clean
I fill my chain cleaning device with degreaser and run the chain through until the fluid coming out is nearly clean. Then I remove the chain, place it in an old jar with fresh degreaser, and shake vigorously. The first time I did this, I was shocked at how much grime came out of supposedly “clean” links.
After the soak, I use an old toothbrush to work between the plates and rollers. This is where abrasive paste hides and accelerates wear. I pay special attention to the inner surfaces where the chain contacts the cassette and chainrings.
Rinsing and Drying
I rinse thoroughly with clean water, then dry completely with compressed air or by hanging in a warm spot. Moisture is the enemy here—a damp chain will rust internally within hours. I learned this the expensive way when a “clean” chain seized up after storage.
Lubrication: The Critical Step
This is where I see the most mistakes. Chain lube isn’t one-size-fits-all, and application technique matters enormously.
My lube choices by condition:
- Dry, summer riding: Thin, wax-based lube. I use Squirt or similar. It keeps chains clean but requires frequent reapplication.
- Wet, winter, or mixed conditions: Full synthetic wet lube. I prefer Morgan Blue or Finish Line Wet. It stays put but attracts more dirt.
- All-rounder: Ceramic lubes offer compromise. More expensive but longer-lasting.
That excess wipe is crucial. I run the chain through a clean rag until it comes away nearly clean. The lubricant is inside where it matters; anything on the surface is problematic.
Chain Wear Monitoring: Don’t Wait Too Long
I’ve touched on this, but it deserves emphasis. A worn chain doesn’t just shift poorly—it destroys your expensive cassette and chainrings. The “stretch” (actually wear on the pins and bushings) causes the chain to ride higher on the teeth, accelerating wear on everything.
I check my chains monthly with a digital caliper or chain wear indicator. I also listen—worn chains make distinctive skipping sounds under load, and they feel vague when pedaling hard. The motor on an eBike can mask some of this, so proactive checking is essential.
When I replace a chain, I always check the cassette. If the new chain skips on worn cogs, the cassette needs replacement too. Running a new chain on a worn cassette just destroys the new chain rapidly. I’ve made this mistake; it’s expensive.
eBike-Specific Chain Considerations
Torque and Load
The mid-drive motors that dominate the European market apply power through the chain. Unlike hub motors that drive the wheel directly, every Newton-meter from a Bosch, Shimano, or Brose motor passes through your chain. This means:
- Higher stress on every link
- More rapid wear at the pins and bushings
- Greater importance of proper chain line
I always shift to an appropriate gear before engaging heavy motor assistance. Starting from a stop in high gear with full turbo mode is a recipe for premature chain failure. The motor doesn’t care about your chain’s wellbeing—it applies power regardless.
Chain Line Matters More
Because eBikes are heavier and more powerful, chain line—the alignment between chainring and cassette cog—becomes more critical. Poor chain line causes lateral loading, accelerating wear and increasing the chance of breakage.
I check chain line whenever I service my bikes. For 1x systems common on eBikes, this means ensuring the chainring aligns with the middle cassette cog. For bikes with front derailleurs, I avoid cross-chaining (big ring to big cog, or small to small) more strictly than on conventional bikes.
Speed Sensors and Chain Care
Many European eBikes use speed sensors mounted near the rear wheel or chainstay. When cleaning or lubricating, I’m careful to keep degreaser and lube away from these sensors. Contamination can cause erratic motor behavior or error codes. I learned this after a thorough cleaning left my Bosch system throwing speed sensor errors for hours.
When to Replace: Beyond the Chain Itself
I replace chains preventively, but I also watch for these warning signs:
- Visible damage: Cracked plates, twisted links, or rust that can’t be cleaned. Any of these means immediate replacement.
- Stiff links: Links that don’t bend smoothly create skipping and shifting problems. Sometimes cleanable, often not.
- Excessive noise: A well-maintained chain is nearly silent. Growing noise indicates wear or inadequate lubrication.
- Shifting degradation: If adjusting derailleur doesn’t fix shifting, chain wear is often the culprit.
I always replace chains with matching speed ratings. An 11-speed chain on a 10-speed system works poorly; mixing brands can cause compatibility issues. For my Bosch-powered touring bike, I use specific eBike-rated chains from KMC or Shimano—these have additional reinforcement at the rivets where eBike stress concentrates.
Seasonal Considerations for European Riders
Winter Riding and Storage
Living in northern Europe, I ride through winter when possible. The combination of road salt, wet conditions, and grit is brutal on chains. My winter protocol:
- Clean and lube weekly instead of bi-weekly
- Use wet lube exclusively
- Rinse with clean water after salty rides (when above freezing)
- Store indoors if possible, or at least under cover
After particularly wet or salty rides, I’ll do a quick wipe-down and re-lube even if the chain isn’t technically dirty. Salt corrosion happens fast and isn’t always visible.
Summer Touring
Long European tours—my annual Alps crossing, for instance—demand reliability. I carry a quick link and a chain tool, and I inspect the chain daily. On my last tour, I replaced a chain at 1,800km after noticing accelerated wear from the constant climbing. Better to replace mid-tour than walk down a mountain pass.
I also carry a small bottle of lube and apply every 150km or after wet days. The convenience of stopping for ten minutes beats the alternative.
Common Mistakes I See (and Have Made)
Over-lubricating: More lube doesn’t mean more protection. It means more dirt accumulation and a grinding paste that destroys everything. Less is more.
Using the wrong lube: I’ve seen riders use motor oil, WD-40, or household lubricants. These either attract too much dirt, lack protective properties, or evaporate quickly. Use proper bicycle chain lubricant.
Ignoring chain wear: “It still looks fine” is expensive thinking. A €25 chain protects a €150 cassette and €80 chainring set. Replace early.
Improper joining: eBike chains need precise joining. Follow manufacturer instructions for quick links or riveting. I’ve had chains fail from improper quick link installation—scary at 45km/h.
Forgetting the rest of the drivetrain: A clean chain on dirty cogs just gets dirty again. I clean my cassette and chainrings whenever I deep-clean the chain.
Advanced Tips for the Dedicated eBike Owner
After years of experimentation, a few practices have proven their worth:
Chain waxing: I occasionally wax my chains using molten paraffin with teflon additive. It’s time-consuming but provides incredibly clean, long-lasting lubrication. I save this for my fair-weather bikes and touring season.
Multiple chains: For my high-mileage bikes, I keep two chains and rotate them every 1,000km. This evens out cassette wear and extends overall drivetrain life. It’s more work but saves money long-term.
Electronic shifting integration: Many premium European eBikes now come with Di2 or similar electronic shifting. These systems often have chain wear indicators in the app. I use these but verify with physical measurement—electronics can fail or miscalibrate.
For anyone considering a new eBike, understanding long-term maintenance costs is important. Our value guide helps balance upfront cost against ongoing maintenance. And if you’re curious about how manufacturer claims hold up, our analysis of range claims versus reality is eye-opening. If you’re shopping for a specific rider, our women’s eBike guide covers important fit and design considerations.
FAQ: eBike Chain Maintenance
How much does chain maintenance typically cost for European eBike owners?
Annual chain costs vary enormously based on mileage and conditions. For my commuter doing 5,000km yearly, I spend approximately €80-120 on chains and €30 on lubricants. My touring bike, with 3,000km of loaded riding, runs €100-150 in chains. Doing your own maintenance cuts costs by 60-70% versus shop service. The key investment is time and learning proper technique.
Can I use a standard bike chain on my eBike, or do I need an eBike-specific one?
While standard chains will physically fit, I strongly recommend eBike-rated chains for mid-driveystems. Chains from KMC (EB series), Shimano (E-Bike specific), and SRAM (Eagle with solid pins) have reinforced rivets and plates designed for higher torque. I’ve broken standard chains on eBikes; the failure is sudden and potentially dangerous. For hub motor eBikes, standard chains are fine since the motor doesn’t stress the chain.
Why does my eBike chain seem to need more frequent attention than my regular bicycle?
Three factors combine: higher torque (40-85 Nm versus human power), significantly more weight (25-30kg versus 10-15kg), and often higher mileage (eBikes encourage longer rides). The motor applies power more consistently than human legs, eliminating rest periods that allow chains to cool and lubricant to redistribute. Additionally, European eBikes often see more utility use—commuting in all weather, carrying cargo—which compounds wear.
Is it worth investing in a belt drive instead of a chain for my eBike?
Belt drives (Gates Carbon Drive being the main option) offer compelling advantages: no lubrication, longer service life, quieter operation, and cleanliness. I’ve run belts on two eBikes and loved them. However, they require frame compatibility (no derailleur, specific dropout design), cost more initially, and aren’t suitable for all gearing ranges. For urban commuting and moderate terrain, I recommend belts highly. For touring with wide gear ranges or budget-constrained builds, chains remain practical. The belt also demands precise tension and alignment—setup mistakes cause rapid wear.
What should I do if my eBike chain breaks while riding?
First, stay calm and brake safely—sudden chain breakage can be startling. If the chain is completely severed, you cannot pedal but may still have motor assistance on hub-drive bikes (though this is risky and not recommended). For mid-drives, you’re stranded. Carry a quick link appropriate for your chain speed, a chain tool or quick link pliers, and know how to use them. Practice at home first—roadside repairs in rain are not when to learn. Remove damaged links, install the quick link properly, and check that the chain runs smoothly before riding. Inspect thoroughly at your destination; temporary repairs need proper attention soon.
Chain maintenance isn’t glamorous, but it’s the difference between a reliable eBike and an expensive frustration. I’ve learned these lessons through mistakes so you don’t have to. Treat your chain well, and it will carry you thousands of kilometers through everything European riding can throw at you. Happy spinning!