Quick Verdict
If you have a basic set of metric wrenches and can follow a YouTube tutorial without skipping steps, you can absolutely learn how to set up e bike kit systems yourself and save $500+ in labor costs. However, if you are buying a cheap, unbranded hub motor kit from a marketplace with zero support, stop now — you will end up chasing wiring ghosts and ebike error code 08 messages until you throw the bike in the garage. For 90% of DIYers, a Bafang mid-drive is the sweet spot for reliability, while rear hub kits are better for casual cruisers who don’t climb steep hills.
Real-World Scenario: The “Saturday Afternoon” Trap
Imagine this: It’s 10 AM on a Saturday. You’ve got a vintage steel-frame mountain bike that feels too heavy to pedal up the hill to your local coffee shop. You bought a “1000W Conversion Kit” online because the photos looked cool. By 2 PM, you’re sweating, your chain won’t stay on, and the display is flashing an ebike error code 08 that the instruction manual (written in broken English) says means “motor malfunction.”
I’ve been there. Three years ago, I tried to convert an old Trek 820 using a generic hub motor kit. I skipped torqueing the spokes correctly because I didn’t have a spoke wrench. Two weeks later, the wheel collapsed under me at 15 mph on a wet road. Learning how to set up e bike kit components isn’t just about plugging wires together; it’s about understanding mechanical stress, electrical safety, and knowing when a part is junk before you install it. This guide cuts through the marketing fluff to tell you exactly what works, what breaks, and how to fix it when it does.

Step-by-Step: How to Set Up E Bike Kit Systems (Without Breaking Your Bike)
The process varies significantly depending on whether you choose a hub motor or a mid-drive. The tools you need and the headaches you’ll encounter are completely different.
Option A: Rear Hub Motor Kits (The “Easy” Install)
Hub motors replace your rear wheel. They are generally easier to install but add unsprung weight to the back of the bike, which can make the rear end feel “squirrely” on loose gravel.
- Remove the Rear Wheel: Shift your chain to the smallest cog. Loosen the axle nuts or quick release. Disconnect the derailleur if necessary (though most kits fit standard freewheels).
- Transfer the Cassette/Freewheel: This is where most people fail. You need a specific cassette removal tool and a chain whip. If you force this, you strip the splines. Watch Dude Stuff’s detailed guide on fitting an electric hub motor to see the proper technique for aligning the torque arm.
- Install the Torque Arm: DO NOT SKIP THIS. Hub motors generate massive torque. Without a steel torque arm bolted to the frame dropout, the motor will spin inside the frame, snapping your cables and potentially cracking the aluminum dropouts. I’ve seen frames ruined because riders thought the axle nuts were enough.
- Route the Wiring: Run the phase wires (the thick 3-bundle cable) along the chainstay. Use zip ties, but leave a little slack near the dropout for wheel removal later.
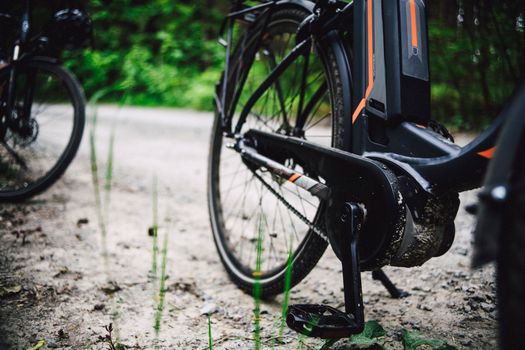
Option B: Mid-Drive Kits (The Performance Choice)
Mid-drives (like Bafang BBS02) mount in the bottom bracket. They leverage your bike’s gears, making them superior for hills. However, learning how to set up e bike kit mid-drives requires working on the bike’s most critical structural point.
| Component | Hub Motor Reality | Mid-Drive Reality |
|---|---|---|
| Installation Time | 2-3 Hours | 3-5 Hours (requires bottom bracket tools) |
| Frame Stress | High stress on rear dropouts | High stress on bottom bracket shell |
| Gearing | Single speed feel (ignores your gears) | Uses your existing cassette (better for hills) |
| Tire Changes | Nightmare (heavy motor, wiring) | Standard bike maintenance |
For mid-drives, you must measure your bottom bracket shell width precisely. Most kits come with spacers for 68mm-73mm shells. If you have an Italian thread or a weird oversized shell, you’re going to need an adapter ring, or the motor won’t lock in place. As noted in the Schematix review of the Bafang BBS02B, the installation is straightforward if you have the right tools, but the wiring harness routing under the bottom bracket is where patience is tested.
The “What the Brand Doesn’t Tell You” Subsection
Manufacturers love to say “fits most bikes.” They don’t tell you that if your bike has a suspension linkage near the bottom bracket, the motor casing might rub against the frame when the suspension compresses. They also don’t mention that cheap kits often come with brake levers that only have a motor cutoff sensor but no actual hydraulic compatibility. If you have Shimano hydraulic brakes, you’ll need to transfer your original brake blades into the new lever housing, which is a fiddly job requiring mineral oil and patience.
Battery, Chargers, and Power Management
The motor is the muscle, but the battery is the heart. This is where safety becomes non-negotiable.
Choosing the Right Voltage and Capacity
Most entry-level kits are 36V, while performance kits are 48V or 52V. Don’t mix voltages. A 48V controller will fry a 36V battery instantly. When looking at capacity (Ah), remember the math: Voltage × Amp Hours = Watt Hours. A 48V 14Ah battery gives you 672Wh. In the real world, expect 30-40 km of range on high assist. If a seller claims 80 km on a 14Ah battery, they are lying.
The Charger Situation: Qlife and Compatibility
Many conversion kits come with generic, brick-style chargers that run hot and charge slowly. If you are upgrading your battery or replacing a lost charger, you might encounter the qlife ebike battery charger ecosystem. Qlife chargers are often found on OEM bikes and some higher-end conversion bundles.
Here is the friction point: Connectors. Even if the voltage matches (e.g., 48V), the plug shape might be XLR, DC5521, or Anderson SB. The qlife ebike battery charger typically uses a specific pinout. If you try to force a mismatched charger, you can reverse the polarity and kill your Battery Management System (BMS). Always verify the pinout diagram before plugging in. I once fried a $400 battery because I assumed a 3-pin XLR connector was standard — it wasn’t, and the ground and positive were swapped.
Charging Safety
Never charge a lithium battery immediately after a ride when it’s hot. Let it cool to room temperature for 30 minutes. Charge it on a non-flammable surface (concrete or tile), not on your bed or carpet. If you smell sweet chemicals, unplug it immediately and move it outside — that’s the smell of electrolyte venting before a thermal runaway.
Troubleshooting: Decoding Ebike Error Code 08
You’ve installed the kit, you’re ready to ride, and the display flashes a number. Panic sets in. The most common and frustrating issue in the DIY community is the ebike error code 08.
What Does Ebike Error Code 08 Mean?
On most generic controllers (and specifically Bafang systems), ebike error code 08 indicates a motor hall sensor fault. Hall sensors are small magnetic switches inside the motor that tell the controller exactly where the rotor is so it can fire the electromagnets at the right time. Without them, the motor doesn’t know which way to spin.
How to Fix It
Don’t return the motor yet. Try these steps in order:

- Check the Connector: The 5-pin connector between the motor and the controller is the usual suspect. It’s often loose or not pushed in all the way. Disconnect it, check for bent pins, and reconnect it firmly. You should hear a distinct “click.”
- Inspect the Wiring: Did you zip-tie the wire too tight near the axle? Did the wire get pinched when you installed the torque arm? Trace the cable from the axle to the controller. Look for cuts or crushed insulation.
- The “Wiggle” Test: Turn the bike on (wheel off the ground). Spin the wheel by hand. While spinning, wiggle the hall sensor connector. If the motor jerks or the error code disappears momentarily, you have a broken wire inside the insulation.
- Controller Mismatch: If you bought a motor and controller separately, they might not be compatible. Some sensors are 60-degree, others are 120-degree. If the angles don’t match, you get ebike error code 08.
If none of this works, the hall sensor board inside the motor is likely dead. On hub motors, this often requires opening the axle cover (voiding warranty) or replacing the entire wheel. On mid-drives, it usually means a warranty claim.
Safety First: Why You Need an Ebike Helmet with Bluetooth
Once you convert a bike, you are riding faster and heavier than a standard cyclist. Standard bicycle helmets aren’t always enough, and carrying a phone in your pocket while navigating traffic is dangerous.
The Case for Connectivity
An ebike helmet with bluetooth isn’t just a gimmick for listening to podcasts. It’s a safety tool. When you are learning how to set up e bike kit systems, you are essentially building a vehicle that can hit 40 km/h (or more if you unlock it). At those speeds, reaction time is critical.
Integrated Bluetooth helmets (like those from Lumos or specialized aftermarket addons) allow you to:
- Take Calls Hands-Free: No fumbling for a phone at a red light.
- Use Navigation Prompts: Hear turn-by-turn directions without looking at a screen mounted on your handlebars, which can be a theft target.
- Emergency Detection: Some advanced helmets detect crashes and send alerts to emergency contacts.
I made the switch to an ebike helmet with bluetooth after a close call with a delivery van. I was listening to music on earbuds, which blocked out the sound of the city. Switching to bone-conduction audio built into the helmet kept my ears open to traffic while still letting me hear my GPS. It’s a small upgrade that pays for itself the first time it prevents an accident.
Real User Signals: What Reddit and YouTube Say
Don’t just take my word for it. The community is full of war stories that highlight where things go wrong.
YouTube Reality Checks
The channel DIY Potentials offers a comprehensive look at installing a 48V 1000W kit. What stands out in their video isn’t just the success, but the time spent troubleshooting the PAS (Pedal Assist Sensor). They show that aligning the magnet ring on the crank arm is finicky; if it’s too far from the sensor, the motor won’t engage. This is a common pain point that manuals gloss over.
Similarly, Hallomotor’s assembly video highlights the importance of spoke tension. They demonstrate using a spoke tension meter, a tool most DIYers skip. The result? A wobbly wheel that ruins the ride quality and wears out the motor bearings prematurely.
Reddit Confessions
On r/ebikes, users consistently debate the value of conversion kits vs. pre-built bikes. One user noted, “It’s 2025 and many e-bike conversion kit recommendation threads are at least a year old.” This highlights how fast the tech moves. What was a good kit in 2022 might be obsolete now.
A particularly telling thread on r/ebikes discusses a user building a 72V beast capable of 90kph. While impressive, the comments section is filled with warnings about frame integrity. One commenter rightly pointed out that a standard aluminum frame isn’t designed for the torque of a 3000W motor. This reinforces my earlier point: don’t put a Ferrari engine in a golf cart chassis.
There’s also the human element. A user on r/ebikes shared their ten-month journey, noting that after the initial “honeymoon phase,” maintenance became a regular part of life. Chains stretch faster, brake pads wear quicker, and bolts need constant retightening due to vibration. If you aren’t willing to do the wrench work, a conversion kit might not be for you.
Who Should Buy This (And Who Shouldn’t)
Buy a Conversion Kit If:
- You have a high-quality frame (steel or titanium) that you love and want to keep.
- You enjoy tinkering and have a basic set of bike tools (torque wrench, spoke wrench, cassette tool).
- You want specific performance specs (e.g., 72V high speed) that pre-built bikes don’t offer legally.
- You are on a tight budget and can source a used donor bike.
DO NOT Buy a Conversion Kit If:
- You expect “Plug and Play”: It’s not. There will be friction, fitting issues, and wiring headaches.
- Your donor bike is cheap department store junk: The weak links (wheels, brakes, fork) will fail under the extra power and weight.
- You live in an apartment with no workshop space: You need room to spread out parts and charge batteries safely.
- You panic when you see an error code: If ebike error code 08 sounds like a death sentence rather than a troubleshooting puzzle, buy a pre-built bike with warranty support.
Value & Pricing: The Hidden Costs
A “1000W Kit” might cost $600 on paper. But let’s talk real costs.
- Kit: $600
- Battery (Quality 48V 14Ah): $450 (Don’t cheap out here)
- Tools (Spoke wrench, torque arm, cassette tool): $100
- Upgraded Brakes: $80 (Your old V-brakes won’t stop a 30kg e-bike)
- Helmet with Bluetooth: $150
Total: ~$1,380.
For that price, you could almost buy an entry-level pre-built e-bike on sale. The value of a kit isn’t saving money; it’s customization and the satisfaction of building your own machine. If you just want transportation, buy complete. If you want a project, build it.
FAQ
Is it hard to set up an e-bike conversion kit?
It ranges from moderate to difficult depending on the kit type. Rear hub kits are generally easier for beginners, requiring basic wrench skills and 2-3 hours of work. Mid-drive kits (like Bafang) are more complex, requiring bottom bracket tools and precise wiring management, often taking 4+ hours. If you can fix a flat tire and follow a YouTube tutorial, you can do it.
What does ebike error code 08 mean and how do I fix it?
Ebike error code 08 typically indicates a motor hall sensor fault, meaning the controller isn’t receiving signals about the motor’s position. To fix it, check the 5-pin motor connector for loose connections, inspect the wiring for damage near the axle, and ensure the controller and motor are compatible. If the wiring is intact, the hall sensors inside the motor may be damaged.
Can I use a qlife ebike battery charger with any conversion kit?
No, you cannot assume compatibility. While a qlife ebike battery charger might have the correct voltage (e.g., 48V), the connector plug shape and pinout polarity must match your battery exactly. Using a mismatched charger can reverse polarity and destroy your battery’s BMS. Always verify the connector type (XLR, DC, Anderson) and pin configuration before connecting.
Why should I get an ebike helmet with bluetooth?
An ebike helmet with bluetooth enhances safety by allowing hands-free communication and navigation without distracting you from the road. It enables you to hear turn-by-turn directions and take calls without fumbling for a phone, which is crucial when riding faster, heavier e-bikes in traffic. Some models also feature integrated lights and crash detection.
Do I need a torque arm for my hub motor kit?
Yes, absolutely. A torque arm is essential for any hub motor conversion to prevent the motor from spinning inside the frame dropouts. Without it, the immense torque can snap your cables, damage the frame, or cause the wheel to detach while riding. It is a critical safety component that should never be skipped.