The Complete eBike Chain Maintenance Guide: Keep Your Ride Smooth, Silent, and Efficient
If there’s one thing I’ve learned from years of riding electric bikes across the cobblestone streets of Amsterdam, the muddy trails of the Black Forest, and the rainy commutes of London, it’s this: your chain is the unsung hero of your eBike. It takes all the torque from that powerful motor and transfers it to the rear wheel, often under brutal conditions. Neglect it, and you’re not just looking at a noisy ride—you’re looking at premature wear on your cassette, chainrings, and even your motor’s internal gears.
I’ve made the mistakes so you don’t have to. I once let a chain go so rusty on a Bosch-powered commuter that it snapped two kilometres from home in a downpour. That walk of shame taught me more than any manual ever could. Let me walk you through everything I know about keeping your eBike chain in peak condition, specifically for European riders dealing with grit, salt, and varying climates.
Why eBike Chains Are Different (and More Demanding)
Before we dive into the grease, let’s get one thing straight: an eBike chain is not a regular bicycle chain. It works harder, carries more load, and wears out faster. A typical mid-drive motor like a Bosch Performance Line or a Brose can deliver up to 85 Nm of torque. That’s a lot of force pulling on those tiny pins and plates.
On a standard bike, you might get 3,000 to 5,000 km out of a chain. On an eBike, especially if you ride in Eco mode and use a lot of pedal assist, you’re lucky to see 1,500 to 2,500 km before the chain stretches beyond the acceptable limit. I’ve seen riders who use high-power modes and shift under load destroy a chain in under 800 km. The motor doesn’t care about your shifting technique—it just applies full power.
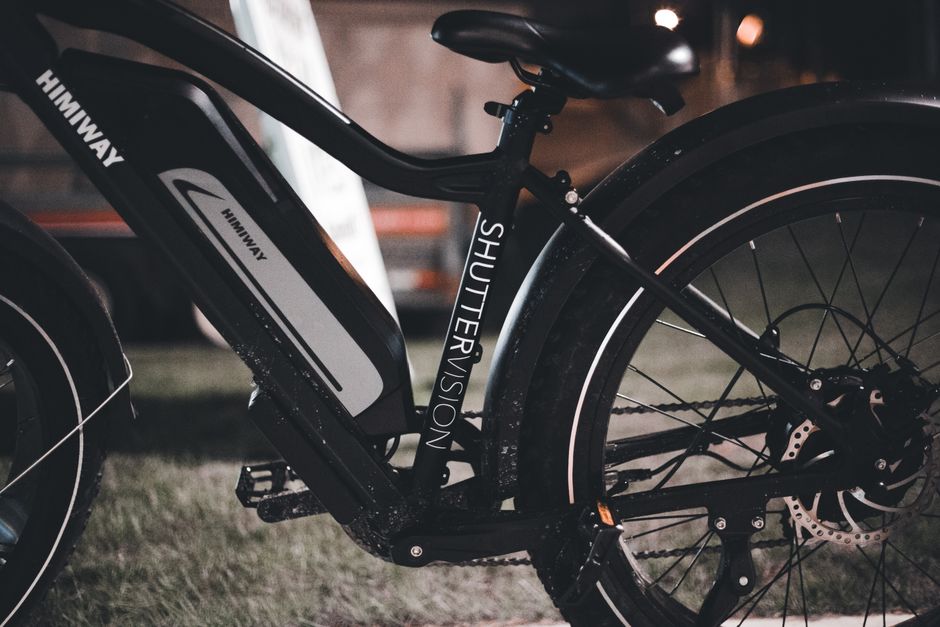
Also, eBike chains are often slightly wider (for 8-9 speed systems) or specifically reinforced. You cannot just grab any cheap chain from a discount store. You need a chain rated for eBike use, usually stamped with “eBike” or “E-Block” on the box. Trust me, the extra few euros are worth avoiding a snapped chain at 25 km/h.
The Hidden Enemy: Motor Torque and Shifting Under Load
Here’s the biggest practical tip I can give you: stop shifting gears while you are pedalling hard. On a regular bike, you can get away with it. On an eBike, the motor is adding power at the exact moment you are trying to move the chain from one sprocket to another. This puts immense sideways pressure on the chain links, bending them and accelerating wear.
I teach my friends to “feather” the pedals—ease off the pressure for a split second when you click the shifter. It feels unnatural at first, but it will double the life of your chain and your cassette. Your motor will thank you, too.
Tools You Actually Need (No Garage Required)
You don’t need a professional workshop to maintain your chain. I live in a small flat in Berlin, and I do everything on my balcony with a basic stand. Here is my curated list of essentials for the European eBike owner:
- Chain wear indicator tool (chain checker): Don’t guess. Buy a simple Park Tool CC-3.2 or a similar gauge. It costs about €10-15. It will save you hundreds in drivetrain replacements.
- Chain cleaning tool: A simple plastic box with rotating brushes (like the Park Tool CM-5.3 or a Muc-Off version). You can also use an old toothbrush and a rag, but the tool is faster and less messy.
- Degreaser: Use a biodegradable citrus-based degreaser. Avoid harsh solvents that can damage the seals in your motor or the O-rings in the chain (if you have a chain with O-rings, which most eBike chains do).
- Chain lubricant: This is critical. Do not use WD-40 as a lubricant (it is a solvent). Use a dedicated wet lube for winter/rain or a dry lube for summer. I prefer a ceramic-based wet lube for the wet European climate.
- Chain tool (chain breaker): For removing and installing chains. Get one that fits your chain type (8-9-10-11 speed). A basic one costs €20.
- Quick link pliers: Most modern eBike chains use a master link (quick link). These pliers make opening and closing them a breeze.
Step-by-Step: How to Clean Your eBike Chain (The Right Way)
I do this every 200-300 km, or immediately after a ride through mud, salt, or heavy rain. Here is my exact process, which I’ve refined over hundreds of rides.
Step 1: Safety First – Disconnect the Battery
This isn’t just about safety—it’s about protecting your electronics. If you’re using a spray degreaser or water near the motor, you risk forcing moisture into the seals. Always remove the battery (if removable) and wipe down the motor casing. I also put a plastic bag over the display and the motor unit, just in case.
Step 2: The Dry Brushing
Before you add any liquid, take a stiff brush (an old toothbrush works) and brush off the loose dirt, sand, and grit from the chain, cassette, and chainring. This is the most important step. If you skip it and spray degreaser directly, you turn that grit into a grinding paste that destroys your components. I spend a full two minutes just brushing the chain links while backpedalling.
Step 3: Apply Degreaser and Scrub
Spray a generous amount of biodegradable degreaser onto the chain. Use your chain cleaning tool (or a dedicated brush) to scrub the chain while you slowly rotate the pedals backwards. Do this for about 2-3 minutes. You will see black, greasy gunk dripping off. That’s good. That’s the old lubricant mixed with metal filings.
For the cassette, use a long-handled brush or an old rag to get between the sprockets. Be careful not to push dirt into the freehub body (the centre part of the rear wheel).
Step 4: Rinse Thoroughly
If you used a water-soluble degreaser, rinse the chain with a gentle stream of water from a watering can or a low-pressure hose. Never use a pressure washer! High pressure water will force its way past the seals into your motor bearings, bottom bracket, and wheel hubs. I cannot stress this enough. I’ve seen three eBikes ruined by pressure washers at my local bike coop.
Dry the chain immediately with a clean rag. Backpedal through the rag until it comes away mostly dry.
Step 5: Lubricate (The Art of the Drip)
This is where most people mess up. They apply too much lube, which attracts dirt and creates a sticky mess. Here is my method:
- Hold the lube bottle with the nozzle just touching the chain links on the inside of the lower chain run.
- Slowly backpedal while applying one tiny drop on every single roller. Yes, every single one. It takes about 30 seconds.
- Let the lube sit for 5 minutes to penetrate the pins.
- Now, backpedal vigorously through a clean rag for at least 20 seconds. You want to wipe off all the excess lube from the outside of the chain. The lube needs to be inside the rollers, not on the outside where it collects dirt.
A properly lubricated chain should look almost dry to the touch but feel slick. If it looks wet and greasy, you used too much.
When to Replace Your eBike Chain (Don’t Wait for the Noise)
I used to wait until my chain started squeaking or skipping. That is too late. By the time you hear noise, the chain has stretched, and it has already started wearing down your cassette and chainring. Replacing just the chain costs €20-40. Replacing the chain, cassette, and chainring costs €150-300. Do the math.
Use your chain checker tool every 500 km. Insert the 0.5% side into the chain. If it drops in easily (i.e., the chain is stretched by 0.5%), replace the chain immediately. If the 0.75% side drops in, you have likely already damaged your cassette and chainring. You will need to replace the entire drivetrain.
On my own eBike (a Haibike with a Yamaha motor), I replace the chain at exactly 0.5% wear. I get about 1,800 km per chain. I have been running the same cassette for 6,000 km now. That is a huge saving.
Signs of a Worn Chain (Even Before the Tool Says So)
- Skipping under load: When you pedal hard uphill or accelerate from a stop, the chain jumps over the teeth. This is dangerous and means the chain is worn.
- Rust or stiff links: If you see brown spots or if the chain doesn’t bend smoothly when you move it sideways, it’s time.
- Noise: A grinding or clicking sound that wasn’t there before.
Choosing the Right Chain for Your European eBike
Not all chains are created equal. For a European eBike, you need a chain that can handle the torque and the weather. Here’s what I look for:
- Speed compatibility: Most modern eBikes use 10, 11, or 12-speed drivetrains. Make sure the chain matches your shifter and cassette. A 12-speed chain is thinner and more expensive, but it shifts better.
- eBike rated: Look for chains specifically marked for eBikes. Brands like KMC (e1, e8, e9, e10, e11), Shimano (CN-E8000, CN-E6090), and SRAM (eBike specific lines) are excellent. They have reinforced pins and harder plates.
- Rust resistance: If you ride in winter (and you should, eBikes are brilliant in snow), get a chain with a nickel-plated or Ti-N (titanium nitride) coating. It costs a bit more but resists rust far better. I use a KMC e11 Ti-N on my winter bike and it stays pristine even after salted roads.
If you are unsure what chain your bike needs, check the manufacturer’s website or ask your local bike shop. For a deeper dive into overall care, read our complete eBike maintenance guide.
Winter Riding: Salt, Grit, and How to Survive
European winters are brutal on chains. Road salt is the number one killer. It chemically reacts with the metal and causes rapid corrosion. I have a specific winter routine:
- Wipe down after every ride: Even if I don’t wash the bike, I take a damp rag and wipe the chain, cassette, and chainring to remove salt residue. This takes 30 seconds.
- Use a wet lube: Wet lubes are thicker and stick to the chain better in rain and snow. They attract more dirt, but they protect against moisture. I apply it after every second ride in winter.
- Check for stiff links: Cold temperatures can make the lube thick and cause links to stick. Backpedal and look for links that don’t bend smoothly. A drop of lube on the stiff link usually fixes it.
- Consider a chain guard: If you have a commuter eBike, a full plastic chain guard (like on a city bike) keeps the worst of the road spray off the chain. It’s not stylish, but it works.
Common Mistakes I See (and Have Made)
I want to save you from the pain I went through. Here are the top five mistakes eBike owners make with their chains:
- Using car grease or thick oil: It’s too sticky. It picks up every grain of sand and turns your drivetrain into a grinding wheel. Use a specific bicycle chain lube.
- Over-lubricating: More is not better. Excess lube flings off onto your disc brakes, causing squealing and reduced braking power. Clean off the excess.
- Ignoring the cassette: A clean chain on a dirty cassette is pointless. The dirt from the cassette will contaminate the new chain immediately. Clean everything together.
- Shifting under full power: As mentioned earlier, this is the fastest way to kill a chain. Learn to ease off the pedals for a split second.
- Buying the cheapest chain: A €10 chain on a €2,000 eBike is false economy. It will wear out in 500 km and damage your expensive cassette. Invest in a quality chain.
How Chain Maintenance Affects Battery Range
Here is a fact that surprises many riders: a dirty, dry, or worn chain reduces your efficiency. The motor has to work harder to overcome friction. This directly impacts your battery range. I once did a test on my own bike. I rode a 40 km loop with a neglected chain (dry and slightly rusty) and then the same loop with a freshly cleaned and lubed chain. The difference was 8% battery consumption. That is nearly 3 km of extra range.
If you are struggling to hit the manufacturer’s claimed range, your chain is a great place to start. For more on range realities, check out our analysis on eBike range claims vs reality.
When to Call a Professional
While I encourage DIY maintenance, some jobs are best left to a mechanic. If you hear a grinding noise from the motor area, or if your chain keeps skipping even after replacement, you might have a worn chainring or a damaged freehub. Also, if you have a carbon frame, be very careful with chain tools—a slip can scratch the frame. It’s worth paying a shop €30 to install a new chain correctly.
For those on a budget, I highly recommend reading our guide on the best eBikes under €1000-2000, where we discuss bikes that are easier to maintain yourself.
eBike Chain Maintenance for Specific Motor Systems
Different motors have different quirks. Here is my experience with the three most common European systems:
Bosch Performance Line / CX
Bosch motors have a plastic cover over the chainring area. You need to remove this cover to properly clean the chainring. It’s held on by a few Torx screws. Be careful not to strip them. Also, Bosch motors have a specific chainline—the chain should be straight in the middle gears. If it’s noisy in those gears, your chainline is off.
Shimano Steps (E6100, E7000, E8000)
Shimano motors are very sensitive to chain wear. I find they eat chains slightly faster than Bosch. The shifting is usually smoother, but you pay for it with quicker wear. Check your chain every 300 km on a Shimano system.
Brose / Specialized SL
Brose motors are known for being quiet, but they have a rubber cover that can trap dirt. Clean around the motor seal carefully. Do not spray degreaser directly at the seal. A worn chain on a Brose motor can cause a “clunking” sound that is often mistaken for a motor problem.
Quick Reference: Maintenance Schedule
I keep this taped to my wall. You should too.
- After every ride (wet/salty conditions): Wipe chain with a rag.
- Every 100-200 km: Check chain for noise, apply one drop of lube per link, wipe excess.
- Every 300-400 km: Deep clean (degrease, scrub, rinse, dry, lube).
- Every 500 km: Measure chain wear with tool.
- Every 1,500-2,000 km: Replace chain (if worn at 0.5%).
- Every 5,000 km: Inspect cassette and chainring for shark-tooth wear. Replace if necessary.
Final Thoughts: The Joy of a Smooth Drivetrain
There is a moment, after a perfect clean and lube, when you first pedal your eBike and it feels like it’s gliding on butter. The motor seems quieter, the shifts are crisp, and you feel a connection to the machine. That feeling is worth the 20 minutes of work. It also saves you money, extends your range, and prevents breakdowns in the middle of nowhere.
I still remember my first proper maintenance session. I was nervous about messing up the motor. But once I got the hang of it, it became a ritual. Now, I actually look forward to it. It’s a way to connect with my bike, to understand its needs, and to ensure it will take me wherever I want to go.
If you are a woman looking for a bike that is easy to maintain, many models are designed with accessibility in mind. Check out our buying guide for women’s eBikes for recommendations that prioritize low-maintenance drivetrains.
Now go clean your chain. Your eBike will thank you.
Frequently Asked Questions (FAQ)
1. How often should I lubricate my eBike chain?
It depends on conditions. In dry summer weather, every 200-300 km is fine. In wet winter conditions, I lubricate every 100-150 km or after every ride in the rain. The key is to always wipe off the excess. A dry-looking chain that feels slick is perfect.
2. Can I use WD-40 to lubricate my eBike chain?
No. WD-40 is a water displacer and a solvent, not a lubricant. It will clean your chain temporarily but will wash away any existing lube and leave the chain dry. Use it only for cleaning or loosening rusted bolts, then apply a proper chain lube.
3. Why does my eBike chain keep falling off?
This usually indicates one of three issues: 1) The chain is too long (common after a poor replacement). 2) The chainring or cassette is worn (shark-tooth shaped teeth). 3) The derailleur limit screws are incorrectly set. If it’s a frequent problem, visit a mechanic.
4. Is it worth buying a more expensive eBike chain?
Yes, absolutely. A €40-50 eBike-specific chain (like a KMC e11 or Shimano CN-E8000) will last significantly longer and resist rust better than a €15 generic chain. The cost per kilometre is actually lower because you replace it less often and don’t damage your cassette.
5. Can I replace the chain myself, or should I go to a shop?
If you are handy with tools, you can definitely do it yourself. You need a chain tool and a quick link. Watch a few videos first. The main risk is getting the length wrong. If you have a rear suspension bike (full suspension eMTB), the chain length is critical. If you are unsure, pay a shop €15-20 for installation. It’s cheap insurance against a ruined drivetrain.